

INTRODUCTION
QUESTION: What is editing?
ANSWER: Editing for motion pictures is the process of organizing, reviewing, selecting, and assembling the picture and sound “footage ” captured during production. The result of these editing efforts should be a coherent and meaningful story or visual presentation that comes as close as possible to achieving the goals behind the original intent of the work — to entertain, to inform, to inspire, etc.
Every motion picture you see on television drama you watch has been edited. Every commercial, news report, and talk show has been edited. Almost every presentation of motion imagery, whether it is fiction, non-fiction, or a melding of the two, has been edited.
A writer pens the story, a director coaches the actors, a cinematographer creates the visual style of each shot, and an editor puts all those pieces together. So an editor is really one of the last creative people to touch a motion picture project. It is his or her skill, craft, and gut instinct that help form the over-arching visual style of the presentation, and often it is also his or her choices that can make or break a program. Of course, an editor can only work as much magic as he or she is given, meaning that the initial quality and quantity of production footage has an awful lot to do with the overall appeal of the final, edited result.
But a good editor can make the difference in the overall final visual presentation.
VIDEO EDITING HISTORY
The First Editing Machine

Moviola, the first editing machine, was invented in 1924 by Iwan Surrier. This machine was used to edit and trim the unwanted scenes in the clip. The machine is still in existence and used majorly in Hollywood.

Who doesn’t know about Oscars? They are considered as one of the highest awards in Hollywood where everyone is honored for their spectacular work. It was in 1934 when Academy Awards introduced the Film Editing Category in the list. The first Oscar for Film Editing was given to Conrad A. Nervig for his excellent contribution to the movie ‘Eskimo’.
The First Video Recorder

In 1956, the industry got its first video recorder- AMPEX. It was also the first device that used magnetic tape to record a video. They brought a new revolution in the industry and changed the entire way of how videos were recorded.
The Period of Revolutionary Inventions (1985-1991)
It was between these 6 years that the video industry saw the introduction and invention of one of the most popular software.
· It all began with the invention of the “Harry” in 1985 by Quantel. Harry was the first all-rounder video editing and digital composting system. However, due to technological limitations, Harry was only capable of applying effects to a maximum of 80 seconds of uncompressed 8-bit video.
· Just after two years, in 1987, Apple launched the Avid Media Composer. It wasn’t the first non-linear editing software but it was a revolutionary design that is still in existence.
· In 1991, Adobe came with its first video editing software Premiere. Premiere Pro, today, has become industry-leading software for video editing. The software is widely used across the globe by both beginners and professionals.
The Digital Revolution
In 1992, the industry got its first movie which was digitally edited by using Avid Media. Let’s kill all the Lawyers was the movie to be edited. Till 1994, there were only three movies that were digitally edited but in 1995, the number reached 100. It was the beginning of the digital revolution that is going on till now.
LEARNING UNIT ONE: IMPORT AND MANAGE MEDIA FILES
LEARNING OUTCOME 1.1: ARRANGE MEDIA FILES ON STORAGE DEVICES
1.1.1 THE DRIVE FORMATS AND REQUIREMENTS
I. Drives formatting
NTFS
EXFAT
FAT 32
Mac OS journaled
When you have a new hard drive, or when you're reinstalling Windows, the OS may ask you to format the drive. If given a choice, the two common modes are NTFS and FAT32. But what are those, and why would you choose one over the other? We break down the differences between FAT32 vs. NTFS.
What They Mean
FAT32 is the older of the two drive formats. FAT32 is the most common version of the FAT (File Allocation Table) file system created back in 1977 by Microsoft. It eventually found its way on the IBM PC's PC-DOS in 1981, and carried over to MS-DOS when that became a standalone product. FAT had been the standard format for floppy disks and hard drives all through the DOS years, and versions of Windows up to and including Windows 8.
NTFS (New Technology Files System) is the newer drive format. Microsoft introduced NTFS in 1993, as a component of the corporate-oriented Windows NT 3.1 and then Windows 2000, though it didn't become common on consumer PCs until Windows XP in 2001. Windows 7 and 8 default to NTFS format on new PCs.
Compatibility
FAT32 is read/write compatible with a majority of recent and recently obsolete operating systems, including DOS, most flavors of Windows (up to and including 8), Mac OS X, and many flavors of UNIX-descended operating systems, including Linux and FreeBSD.
NTFS, on the other hand, is fully read/write compatible with Windows from Windows NT 3.1 and Windows XP up to and including Windows 8. Mac OS X 10.3 and beyond have NFTS read capabilities, but writing to a NTFS volume requires a third party software utility like Paragon NTFS for Mac. There are other hacks and workarounds for NTFS on the Mac, but in any case NTFS is only semi-compatible with OS X. NTFS on Linux systems is spotty for both read and write operations.
Which is Faster?
While file transfer speed and maximum throughput is limited by the slowest link (usually the hard drive interface to the PC like SATA or a network interface like 3G WWAN), NTFS formatted hard drives have tested faster on benchmark tests than FAT32 formatted drives. Other factors will be in play, however, including drive technology (HDD vs. SDD, Flash vs. non-Flash, etc.) and file fragmentation (on spinning drives).
While your OS usually makes the choice of hard drive format for you ahead of time, you can choose which format when you're re-formatting a drive, particularly an external drive. If you need the drive for a Windows-only environment, NTFS is the best choice. If you need to exchange files (even occasionally) with a non-Windows system like a Mac or Linux box, then FAT32 will give you less agita, as long as your file sizes are smaller than 4GB.
Mac OS Extended
Choose one of the following Mac OS Extended file system formats for compatibility with Mac computers using macOS 10.12 or earlier.
· Mac OS Extended (Journaled): Uses the Mac format (Journaled HFS Plus) to protect the integrity of the hierarchical file system. Choose this option if you don’t need an encrypted or case-sensitive format.
· Mac OS Extended (Journaled, Encrypted): Uses the Mac format, requires a password, and encrypts the partition.
· Mac OS Extended (Case-sensitive, Journaled): Uses the Mac format and is case-sensitive to folder names. For example, folders named “Homework” and “HOMEWORK” are two different folders.
· Mac OS Extended (Case-sensitive, Journaled, Encrypted): Uses the Mac format, is case-sensitive to folder names, requires a password, and encrypts the partition.
Windows-compatible formats
Choose one of the following Windows-compatible file system formats if you are formatting a disk to use with Windows.
· MS-DOS (FAT): Use for Windows volumes that are 32 GB or less.
· ExFAT: Use for Windows volumes that are over 32 GB.
II. The Drives Requirements
Hard-Drive Solutions for Video-Editing
Video editing is one of the most demanding tasks you can execute on a computer. A modern video-editing program such as Adobe Premiere requires high performance from the processor, RAM memory, GPU (if using GPU acceleration), as well as storage drives. Choosing a fast storage solution can be a little tougher than picking the fastest computer processor, as there are more tradeoffs involved. The largest drives aren’t always the fastest, and speeds can vary a great deal. This guide was created to help you choose the right storage drive (or drives) for your editing needs, from the small to the large.
Below are a few popular codecs, as well as the amounts of bandwidth they require:
· AVCHD 1080p at 30 fps - 3MB/s
· XDCAM EX 1080p at 30 fps - 4.5MB/s,
· ProRes 422 1080p at 30 fps - 21MB/s
· ProRes HQ 4K at 24 fps - 106MB/s
External drives
If you don't have space in your computer for internal drives, then you will need to use an external drive. External-drive performance is determined by two factors. First, the actual speed of the drive being used is important. The best external single-drive setups use high-performance 7200 rpm drives, like the ones discussed earlier. If a manufacturer does not publish the speed of the internal drive that's used, it’s probably because it's not very fast.

The second factor that determines the performance of an external drive is the speed of the interface used to connect it to the computer. Sometimes external-drive manufacturers will advertise the speed of a drive’s interface as if it were the speed of the drive itself, which is not the case. Also, interface speeds are usually listed in bits per second (remember: there are eight bits in one byte). The interface primarily determines the maximum possible speed at which a drive could work. If a drive is faster than an interface, there will be no benefit, so it’s a good idea to have an interface that's much faster than the drive. Below is a list of different interfaces and what their maximum speeds are.
USB 2.0: This is an old interface whose theoretical maximum transfer rate is 480Mb/s, or 60MB/s. However, actual performance of USB 2.0 is often far lower than its theoretical maximum. This interface should not be used for video editing, since it can barely play back a single track of HD ProRes HQ.
Firewire 800: This is another older interface, though still a good deal faster than USB 2.0. Firewire 800 has a maximum transfer rate of 800Mb/s, or 100MB/s. While it's fast enough for simple edits, Firewire 800 is not recommended, as it is still slower than the speeds of which most hard drives are capable.
eSATA: This is essentially an external SATA II connector, and has a maximum transfer rate of 3Gb/s, or 375MB/s. eSATA is able to reliably transfer data at that speed, though it does not support daisy-chaining, work with hubs, or support bus power. It is a good option for single external drives or two-drive RAID 0.
USB 3.0: This interface replaced USB 2.0 and is far, far faster. The theoretical maximum transfer rate of USB 3.0 is 4.8Gb/s, or 600MB/s. However, to achieve the 4.8Gb/s speed, both the computer and drive must support the USB attached SCSI (UAS) mode. If either device is not using that mode, the performance of USB 3.0 is about the same as eSATA, which is still fast enough for a high-speed single drive, or a dual-drive RAID 0.
III. Safe Storage
What storage is best for video editing?
If you need the best portable storage for video editing, use an external SSD such as the SanDisk Extreme or Extreme Pro Portable SSD. The Samsung T5 SSD drives are also popular. A simple direct attached storage workflow with duplication to cloned external hard drives or a desktop LTO tape drive.
As a video creator your camera source video files are the most valuable thing you have. Project files are usually small, and easy to back up. Almost everything else can conceivably be recreated. But if you lose your source video files, you’ve lost everything.
Making sure you’ve got reliable, fast online video storage to work from is the first step. However, it’s not enough by itself. It’s important to have an overall strategy and workflow for duplication, media management, and disaster recovery. This involves both hardware, and software that needs to integrate well with the way you work.
The Best Storage for Video Editing, VFX, and Color Grading
I’ll admit it, the title of this article, and this section heading is mainly for good SEO. There is no such thing as a one such fits all solution for video and media professionals. The best media storage for video editing and post production is not the same for everyone. This article is intended as a guide for individual video creators using up to an 8-bay desktop RAID storage solution, regardless of whether it is a DAS (direct attached) or NAS (network attached). Beyond this scale, all of the same technical principles apply, but involve much larger systems. Nothing essentially changes at a larger scale. However, rack mounted enterprise shared storage, and robotic LTO tape libraries are beyond the scope of this article.
What you’ll find in this article is an explanation of the requirements to ensure your data is always safe, and the different hardware options you can consider. I’ve tried to make this modular in the sense that you should choose a solution for online working storage, a solution for continuous duplication (backup) and also for long term archive. You can also add cloud storage to any kind of on-site workflow. Working from online storage alone with no backup of your files is not a strategy at all.
I also categorize the common kinds of files in video post production, and suggest what kind of storage is best for them. You’ll also learn about common RAID levels, and the best file system choices to format your drives.
Online vs Nearline vs Offline
I’m certain you’ve heard these terms used widely when discussing video storage. Here are some useful and simple definitions.
· Online Storage is high speed attached working storage for instant access to active video media and other files
· Nearline Storage is attached storage for short term data that needs to be instantly accessible, but doesn’t require the speed of the online storage
· Offline Storage is medium term storage of data that is not attached or instantly accessible. A backup is an example of offline data.
Online Video vs Offline Video (Proxies)
To make things a bit more confusing, the terms “online” and “offline” are also used to describe source video files, and low resolution, compressed video “proxies”. This doesn’t really have anything to do with storage but I’ll explain here to help clarify the terminology and prevent confusion.
· Online video files are full resolution, original source video files
· Offline video files are low resolution, compressed proxy versions of the online video files that have been created (transcoded) directly from the online video files.
Offline video files, sometimes just called proxies, are sometimes created to enable easier and faster editing if the full resolution online video files are too large or too slow for a computer to play back efficiently. In this case an “offline edit” can make use the lower resolution, lower quality proxy video files for fast and fluid editing. Once the edit is locked, the sequence can be reconnected to the full resolution online video files (this process is called a conform) for color grading and export of final deliverables.
Often these offline video proxies can be generated as standalone files, and will always share the exact same filenames, and timecode as the source online video files. They will often have a different file extension (but not always) because the codec and format may be different. As long as the filename and timecode are the same as the parent online video files, it will be possible to easily reconnect (conform) a sequence back to the online video files.
Some software, such as DaVinci Resolve can create optimized media which it handles internally. These are effectively offline proxy video files that Resolve generates and keeps hidden away in a cache directory. It is the same with DaVinci Resolve’s render cache, which are temporary proxy video files rendered only from portions of online source video clips in a sequence.
There are many reasons to create, or use offline proxy video files if they help streamline your workflow or increase performance, but whether they are a standalone set of files, or a hidden cache, they can always be recreated from the original online source video files.
Copy vs Backup vs Archive
Before we can dive into different types of video storage, or even strategy and structure, I want to define the key differences between a copy, a backup, and an archive. It’s easy to blur the lines and think of these all as simply duplication of your video files, but each serves a different purpose.
· Clone is for making data available to use in a different location
· Backup is for recovery from hardware failure or recent data corruption or loss
· Archive is for space management and long term retention
You may or may not need clones of your video files or project data as part of your workflow. The use of networked shared storage is intended to reduce the need to create clones for other machines you might be using, or other collaborators to work with. However, backups and archives need to be a part of every video editor, or creators workflow.
Backup
· One of multiple copies of data in active use
· Kept in sync with active storage
· Should be fast to restore in the event of unrecoverable active online storage failure
· Intended for short term data retention
· Retained for as long as data is in active use
Archive
· Usually the only remaining copy of data no longer in active use
· Long term stability is more important than speed of data retrieval
· Intended for long term retention
· Retained indefinitely
· Data cannot be altered or deleted once archived

1.1.2 FILE AND FOLDER MANAGEMENT
I. Renaming Convention
Ever find your video project folders getting disorganized? Tired of re-naming files as FINALFINAL.mp4 or THISISREALLYTHEFINALVIDEO.mp4? I know, we've all been there. Video editing takes a ton of time (and patience), but organizing your files can make it so much faster! In the past year, my colleague and fellow awesome editor, Adam Lee, introduced me to a folder template structure that made me so much more productive!
I keep a copy of this template folder on my desktop and just copy it over to a new folder each time I start a new project. Below you can download the project folder template for free to use on your own projects. But to give you a preview of how it works, here is an overview and how you can build on it.
· 01 Project Files
o 01 Premiere (save your Premiere Pro Project Files here)
o 02 After Effects (save your After Effects Project Files here)
o You can also make a "03 Photoshop" or "04 Illustrator" if you happen to work with additional software as well.
· 02 Media
o 01 Video
§ Within this folder I'll make additional folders like "01 Day 1" or "01 Card 1" etc.
o 02 Audio
§ 01 Recorded Audio
§ 02 Music
§ You can also add a folder for SFX.
o 03 Photos
o 04 Graphics
· 03 Exports
o 01 AE Exports (For exported After Effects comps)
o 02 Rough Cuts
§ I name my rough cuts like this, "01projectname_roughcut" , "02projectname_roughcut" and so on.
o 03 Final Cuts
§ I name my final cuts like this. "01projectname_finalcut", "02projectname_finalcut" and so on.
· 04 Documents
o 01 Model Releases
o 02 Scripts
o 03 Shot List
o You can also add additional folders if needed.
· 05 Final Assets
o I use this folder to place all final video assets, such as the final video export, thumbnails, closed captions etc.
LEARNING OUTCOME 1.2: IMPORT MEDIA FILES
1.2.1 Introduction to editing software (Adobe premiere pro cc)
I. What is the interface of Adobe Premiere Pro?
Adobe Premiere Pro uses a docked, panel-based interface. The entire interface configuration is called a workspace; the application has five pre-built workspaces to accommodate different working styles and the different tasks you need to accomplish.
You will perform most of your editing work in the different panels of the program’s interface. These panels allow you to import and organize your media and preview your video and audio footage. The Timeline, where most of the actual video editing is performed, is also a panel.
Importing files
There are four basic methods for adding media to your projects: capturing from tape or live sources, importing files from other types of storage, adding from the Organize workspace, or recording narrations from a microphone. When you add media files to your project, they are added to the Project view and the Organize workspace. Each file is represented by a thumbnail, called a clip. Clips, whether they contain audio, video, or still images, are the building blocks of your movies.
Anything you import into your Adobe Premiere Pro CC project will appear in the Project panel. As well as giving you excellent tools for browsing your clips and working with their metadata, the Project panel has special folders, called bins,that you can use to organize everything. No matter how you import your clips, everything that appears in a sequence must appear in the Project panel. If you delete a clip in the Project panel that is already used in a sequence, the clip will automatically be removed from the sequence. Don’t worry, though, because Adobe Premiere Pro will warn you if you do this.
There are three main ways to import files.
1. Standard import
Standard import by choosing File > Import This is the straightforward version of importing and is very similar to the way other applications import files. The keyboard shortcut for this is Cmd +I [Ctl+I], which opens the standard Import dialog.
2. Import using Media Browser
Some files will perform better in Premiere if you import using the Media Browser. The Media Browser in Adobe Premiere Pro allows you to easily browse for files on your computer, then import them – and all their related files – into Premiere. It can also stay open all the time, giving you an immediate and optimized to locate and import footage.
This is the preferred way to import many camera-formatted files, such as AVCHD, which often use complex folder structures with separate files for audio and video. This process also mates video files with associated metadata generated by some cameras. The media browser is like a directory browser, with forward and back buttons for easy navigation.
To import from the Media Browser, simply select a clip (or folder) and drag it into your project panel or double-click the file (or folder To view a panel full screen click on the panel so it is highlighted in blue, then press the tilde (~) key (it’s above the tab key on the left side of the keyboard).
To exit full screen type tilde (~) again or click escape. This is especially useful when using the navigation tool in the Media Browser or trying to view clip thumbnails in the Project tab. This is also how you play back video full screen in Premiere. Pressing tilde (~) maximizes the panel within Premiere, clicking Control tilde (~) makes the video completely fill the screen.
3. Select and drag files from finder into the Premiere project panel
This is the import method most likely to result in an error, which is why it is listed as the third choice. That being said, it is possible to simply drag files into the project panel. We strongly recommend using the media browser to import AVCHD files.
Common click and drag disasters
•Wrong destination – If you drag files or folders into the media browser panel instead of the project panel they are not imported into your project. The same thing happens if you drag a file directly onto the timeline or into the preview window. Premiere sees the file, but it is NOT part of the project. When you close and re-open your project Premiere will not be able to find the path to the source file and it will appear as a broken link. • File imported from card – Always copy files from cards into the project folder, then import from the project folder into Premiere. Never click and drag files from cards or from the desktop, even to preview them. Unless the position of those files is unchanged the next time you open Premiere, the path to these files will be broken.
II. What are the components of the Premiere Pro interface?
There are 25 different panels available in the Premiere Pro interface, and those found in the default editing workspace are described below.
A. Source Monitor.
B. Effect Control.
C. Audio Mixer panel.
D. Metadata panel.
E. Program Monitor panel.
F. Media Browsers panel.
G. Project panel.
H. Info Panel.
I. Effects panel.
J. Markers panel.
K. History panel.
L. Tools panel.
M. Timeline panel.
N. Audio Meters panel.
A. Source Monitor: The Source Monitor can be used to playback and preview individual clips. You can also use the Source Monitor to prepare clips before you add them to a sequence. In the Source Monitor, you can set In and Out points, add markers, and specify how the clip will be added to the Timeline. You can view clips in this monitor by dragging and dropping them into the Source panel or by double-clicking them.
B. Effect Controls panel: Special effects can be added to video and audio clips on the Timeline. Some effects, for example, can change color video to black-and-white, while others alter the color balance of an image or can help to simulate the look of film. The Effect Controls panel allows you to edit effects that have been applied to your clips. To access these, you must select it in the Timeline by clicking it. If you do not have a clip selected, the panel remains blank. You can also use the panel to access the inherent Motion, Opacity, and Audio properties of clips.
C. Audio Mixer: You can use the Audio Mixer to adjust settings while listening to audio tracks and viewing video tracks. Each Audio Mixer track corresponds to a track in the Timeline of the active sequence. You can also use the mixer to add effects, change the volume of relative tracks, or to record audio directly into sequence tracks.
D. Metadata panel: Metadata is a set of information that describes the content or properties of a file. Video and audio files automatically include information regarding their file size, format, creation date, and duration. Metadata can also include additional information, such as location, director, scene, shot, etc. The metadata panel allows you to edit and view these properties so you can use them to organize and sort your files, or share with other Adobe applications.
E. Program Monitor: The Program Monitor is your live monitor; it is used to playback and preview only the clips on the Timeline.
F. Project panel: Video editing is a non-destructive editing process because you do not edit the original content of your files. The Project panel contains references to all the footage files (video, audio, and images) that you have imported into Premiere Pro in addition to the sequences, titles and other supporting material you create in the application.
G. Media Browser panel: The Media Browser helps you browse and preview files on your hard drive. You can leave the Media Browser open and dock it, just as you would any other panel. The Media Browser gives you quick access to all your assets while you edit.
H. Info panel: The Info panel displays information regarding the currently selected item in the Project panel or Timeline.
I. Effects panel: The Effects panel is a repository for all the video and audio effects and transitions available in the application. You can place transitions such as Dissolves, Dip to Black, and Page Peels between clips to allow you to transition from one clip to another. You can add effects such as Black and White, Levels, and Balance, to individual clips, to change their appearance or audio qualities.
J. Marker panel: You can use the Marker panel to see all the markers in an active clip or sequence. The panel displays marker information such as In and Out points, comments and color coding tags.
K. History panel: The History panel stores a list of the actions you have performed to change the state of your project in the current working session. As an alternative to using Edit > Undo, or the keyboard commands Ctrl+Z (Windows) or Cmd+Z (Mac OS), you can use this panel to jump back to any previous state in the current work session. However, you should note that changes you make to the program that affect panels, windows, or preferences are not stored in the History panel. Also, when you close and reopen Premiere Pro, the History panel is automatically reset and you lose access to the previous states of your project.
L.Tools panel: This panel stores the various editing tools you can access in the application. The cursor changes appearance based on the tool that is active and the type of content that you are hovering over.
M. Timeline panel: You perform the majority of your editing work on the Timeline panel, including adding clips, positioning them, and changing their properties. You can also use the Timeline to add effects and transitions to the video and audio clips in your project. Each sequence in the project is a separate, independent Timeline. When multiple Timelines are visible, the panel uses a tabbed display similar to a web browser to separate each.
N. Audio Meters panel: This panel is a VU (Volume Units) meter. It shows the volume of clips that are on the Timeline. The display in this panel is active only when you preview the video and audio clips on the Timeline.
Understanding the tools
Premiere Pro has eleven different tools that were designed to perform a single specific task useful during the editing process.
| |
| A. Selection tool. B. Track Selection tool.C. Ripple Edit tool. D. Rolling Edit tool. E. Rate Stretch tool. F. Razor tool. G. Slip tool. H. Slide tool. I. Pen tool. J. Hand tool. K. Zoom tool. |
A. Selection Tool: Use this tool to select clips, menu items, buttons, and other objects found in the user interface. We recommend you configure the Selection tool to be selected by default after using the more specialized editing tools, since most clip and interface interaction requires using the Selection tool.
B. Track Selection Tool: Use this tool to select all clips to the right of the cursor in a sequence. Click a clip with this tool to select the clip and the ones to the right on a single track. Hold the Shift key and click a clip to select the clip and the ones to the right on every track.
C. Ripple Edit Tool: You can use the Selection tool to trim the start or end of a clip in the Timeline; however, you might create an empty space between the clips on your Timeline. Use the Ripple Edit tool to trim the In or Out point of a clip, close gaps caused by the edit, and preserve all edits to the left or right of the trimmed clip.
D. Rolling Edit Tool: Use this tool to simultaneously change the In and Out points of a pair of adjacent clips on the Timeline: the Rolling Edit Tool trims the In point of one clip and the Out point of the other clip, leaving the combined duration of the two clips unchanged.
E. Rate Stretch Tool: This tool is used to shorten or lengthen a clip in the Timeline. The Rate Stretch tool speeds up or slows down the playback of the clip without trimming the clip, thus leaving the In and Out points of the clip unchanged.
F. Razor Tool: Use this tool to split clips in the Timeline. Click any point on a clip to split it at that exact location. To split all clips across all tracks at an exact point, press and hold the Shift key while clicking a clip.
G. Slip Tool: Use the Slip tool to simultaneously change the In and Out points of a clip in a Timeline, while keeping the overall duration of the clip unchanged.
H. Slide Tool: Use this tool to move a clip to the right or left on the Timeline while trimming any adjacent clips. The combined duration of the clips, and the location of the group in the Timeline, remain unchanged.
I. Pen Tool: All clips have a set of inherent properties that you can animate using the Effect Controls panel. Select the Pen tool to set or select key frames for clips in the Timeline.
J. Hand Tool: Use this tool to move the viewing area of a Timeline to the right or left as an alternative to the scroll bar at the base of the Timeline panel.
K. Zoom Tool: Select this tool to zoom in or out in the Timeline viewing area.
CUSTOMIZING THE INTERFACE
There are a series of pre-installed workspaces that come with the application to be used as a starting point so you can begin working immediately. However, since it is impossible for the application’s developers to predict the needs of every user, we recommend you customize and adjust the interface to fit your specific needs and style.
In this section, you will adjust the Editing workspace to fit the needs of the project you will work with in this lesson. The first procedure is to remove panels you will not be working with at this time.
1 Choose File > Open Project. In the Open Project dialog box that appears, navigate to the pr02lessons folder that you copied to your hard drive and open the file named pr0201.prproj. This file contains a single sequence in the Project panel named Travelogue-Boston.
| | An alternative way to open a project is to use a keyboard shortcut. To open the Open Project dialog box, press and hold the Control key (Windows) or the Command key (Mac OS) and press the letter O on your keyboard. |
2 Choose File > Save As. In the Save As dialog box that appears, navigate to the location on your hard drive where you saved the project files folder and then to the Lesson 2 folder. Rename the file pr0201-working and click the Save button. This file will be your working file for the remainder of this lesson.
Opening, closing, and moving panels
To customize the application interface, you should close, open, and reposition panels that are not necessary for the type of work you will perform in this work session.
In this section, you will customize the interface to remove some of the default panels and create a new custom editing workspace where there is more space for the Timeline. We recommend you have as much space as possible for the Timeline and monitors, since most of your work is carried out in these panels.
SETTING APPLICATION PREFERENCES
Application preferences control the overall functionality of Premiere Pro, and you can edit them at any time. The application preferences allow you to change nearly any aspect of the program, from the default length of transitions and still images, to the interface color and the frequency and number of automatic backups made for your projects.
In this section, you will configure the auto-save feature to make more copies of your project file at shorter intervals.
1 Choose Edit > Preferences > General (Windows) or Premiere Pro > Preferences > General (Mac OS) to open the Preferences dialog box.
2 From the list of categories on the left, choose Auto Save to view the preferences for how Premiere Pro automatically backs up your files.
There are two settings for the application’s Auto Save functionality: Automatically Save Every and Maximum Project Versions.
3 Change the value of the Automatically Save Every property to 10 minutes, and then change the value of Maximum Project Versions to 20 and click OK. This increases the frequency of the Auto Save function, while creating more project versions so you have a greater choice of file back-ups. While most users will admit that auto-save is a great feature, not all can agree on the best frequency for saving files. When the application runs the auto-save command, it can interrupt what you are doing and some users find this quite distracting.

| |
| Auto Save is helpful when the application closes unexpectedly or you need to return to an earlier version of your project. |
| | The Auto Save function does not save over your project file; instead it creates backups of your project file and saves them to the Adobe Premiere Pro Auto-Save folder. This folder is created automatically by the application and stored in the same location as your original project file. |
4 Choose File > Save or press Ctrl+S (Windows) or Command+S (Mac OS) to save the project file. Do not close this file; you will need it in the next exercise.
USING THE PROJECT PANEL
As mentioned previously, the Project panel contains references to all the footage files (video, audio, and images) that you have imported into Premiere Pro. As such, it is the creative hub for all you will create with this application. In addition to references to your imported footage, the panel holds the Sequences and Titles that you can create within the application, and is where you locate the items you want to add to the Timeline.
Understanding media management
Media Management is the organization or management of the media you work with in a project. There are two equally important aspects to Media Management. The first is how you manage the media on your hard drives, and the second is how you organize the different media references that you import into Premiere Pro.
To ensure portability, performance, and security, many users highly recommend that you store media on an external hard disk drive. The two standard connection types for external hard drives are FireWire (400 and 800) and USB 2.0. Most video editors recommend a FireWire drive because of its higher sustained bus speed, but any type of drive works for your projects. Newer technologies, such as thunderbolt and USB 3.0, also provide excellent connections for media storage drives. Depending on your system configuration, these connection types may not be available to you at this time.
The files that you will work with to complete the lessons in this book are organized into a single folder called Media Library. Within that folder, there are additional folders for each individual project. In each respective project folder, there are folders that separate the different types of media (video, audio, and still images) you will use. This type of hierarchical structure is also used to keep the project panel organized and makes it easier to locate the media you want to add to the Timeline panel.
Before you can edit any piece of footage on the Timeline, you must first add it to your Premiere Pro project. You can import a wide variety of media, including video, audio, still images, After Effects Projects, and other Premiere Pro projects.
In this section, you will import a variety of media files into your project that you can later organize and add to your Timeline.
1 With the pr0201-working file still open, confirm that you are using the Digital Classroom-Editing workspace that you created earlier in this lesson. If you have made any changes to the workspace, you should reset it now. If the Project panel is hidden behind the Program Monitor, click on the Project panel tab now to bring it forward and make it active.
2 Choose File > Import to open the Import dialog box, then navigate to the Media Library folder located inside the prlessons folder that you copied to your hard drive.
Select the Travelogue-Boston folder, and then select the Video subfolder to reveal the video files you will import for this lesson.
3 Inside the Video folder, there are six video files shot in the city of Boston: Boston-Bridge Pan.mov, Boston-Building Tilt Up.mov, Boston-City Pan.mov, Boston-Marina Pan.mov, Boston-Paul Revere Park.mov, and Boston-TD Garden.mov
Click the first video file in the dialog box, hold the Shift key on your keyboard, and then click the last file to select every file between them.
Click the Import button to import all the selected files into your project panel.

| |
| All recently imported files are automatically selected/highlighted in the project panel. |
| | Holding the Shift key while selecting files only selects files in a sequential list. To select files non-sequentially, hold the Control (Windows) or Command (Mac OS) key and click individual files. |
4 In addition to importing individual or groups of files, you can import entire folders and their content.
Choose File > Import and navigate to the Travelogue-Boston folder in the Media Library. In the Import dialog box, click once on the Audio folder to select it, and click the Import button.

| |
| Importing entire folders is a quick way of importing multiple files, along with their content and subfolders. |
When you import a folder into Premiere Pro, the application automatically creates a bin in the Project panel with the same name as the imported folder. The content of the folder on your hard drives, as well as the content of any sub-folders, is placed inside this bin.
In NLE (Non-Linear Editing) parlance, a bin is basically just the name for a file folder. The functionality of bins in the Premiere Pro Project panel is almost identical to those of the file folders on your computer.
5 Click the reveal triangle to the left of the Audio bin to show the clips that you imported.

| |
| Each bin’s reveal triangle can show and hide the bin’s contents. |
6 Choose File > Save or press Ctrl+S (Windows) or Command+S (Mac OS) to save the project file.
In the next part of the lesson, you will create a new bin to hold the video files you just imported and keep the project panel organized.
Creating and organizing bins
The term bins comes from the days of editing film when the developed film clips were stored in bins for easy organization. In the Premiere Pro project panel, bins serve as file folders to hold and organize your media assets. Bins can hold any combination of media: video, audio, still images, and even other bins. The organizational scheme you use for this exercise will create a separate bin for each different type of media used in the project.
The media management strategy that you adopt depends on the specifics of the project and the quantity of footage. For larger projects, you might break the footage into bins based on the content of the video, location, or for dramatic works, the footage needed for a specific scene (scene-based organizational system).
1 If the Audio bin is still selected, click on any empty area of the Project panel to deselect it. Then create a new bin by clicking the New Bin button located at the bottom-right of the Project panel. Rename this bin video and press Enter (Windows) or Return (Mac OS) to confirm the new bin name.
When you create a new bin, it will automatically be placed inside the bin that you currently have selected. This is why it is important to remember to deselect the Audio bin in this step.
| | When you create a new bin, the default name is highlighted immediately so you can change it. If you click another item in the Project panel or click another pane, the name becomes deselected. To make the name editable again, right-click the bin name and choose Rename from the menu that appears. Additionally, double-clicking the name of any item in the Project panel makes the name editable. |

| |
| The term bin is a legacy from the days of film editing. In practice, bins function exactly like the folders on your hard drive. |
2 Click the first video clip displayed in the Project panel, hold the Shift key on your keyboard, and click the last video clip to select every clip between them.

| |
| Holding the Shift key allows you to select files in sequential order. |
3 Release the Shift key and then click any one of the selected files and drag it to the Video bin. When the bin’s folder icon becomes highlighted, release the mouse to move all the selected files into the bin.

| |
| Moving and arranging media items in the Project panel is similar to moving and arranging files on your hard drive. |
4 Click any empty area of the Project panel to deselect the Video bin, and then click the New Bin button again to create a third bin. Rename this bin Boston Footage and again press the Enter (Windows) or Return (Mac OS) to confirm the new bin name.
5 Click the Audio bin, then press and hold the Control (Windows) or Command (Mac OS), and click the Video bin to select both.
6 Release the Control (Windows) or Command (Mac OS) key and then drag either of the selected bins into the Boston Footage bin. This moves both the selected bins inside the bin named Boston Footage.

| |
| Storing bins inside one another is an efficient organizational tool and can prevent the Project panel from becoming cluttered. |
7 Choose File > Save or press Ctrl+S (Windows) or Command+S (Mac OS) to save the project file.
Now that you have organized the Project panel, in the next part of the lesson you will modify the panels display so that it is easier to view the most relevant information about your media items.
Modifying the Project panel display
The Project panel displays information about each item it contains in a series of columns to the right of each item’s name. This information display can be customized so that you can control which properties display and in what order. This allows you to view only the attributes that are most relevant to the type of work you are currently doing at any given time in Premiere Pro.
Adding/removing columns in the Project panel
The default column display can be changed, to add hidden panels or remove panels that you may consider extraneous.
1 Since the Project panel is very small when compared with the overall Premiere Pro interface, seeing all the columns at the same time is impossible. The first thing you will do is expand the panel to full-screen size. Note that even in full-screen mode you may not be able to view every data column in the Project panel depending on your monitor’s resolution.
Click on any area of the Project panel to select it. You will know it is selected when it has an orange border around it.
With the Project panel selected press the tilde (~) key on your keyboard.
| |
| The tilde (~) key acts as a minimize/maximize toggle for whichever panel is currently active. |
2 The expanded Project panel makes it much easier to see each clip’s properties.
Click on the menu button located at the upper-right corner of the Project panel and from the menu that appears, choose Metadata Display. Metadata is information that is attached to files that contains extra information about the file. For a video clip, metadata could include information such as the length, audio information, or frame size and rate.

| |
| Even though the clip properties are only used inside Premiere Pro they are still listed as a part of the overall metadata properties. |
3 In the Metadata Display panel click on the reveal triangle to the left of Premiere Pro Project Metadata to reveal its properties.
Click and drag the lower-right corner of the dialog box to enlarge it so that you can see all the revealed attributes. Each attribute corresponds to one of the visible columns in the Project panel.

| |
| Some clip properties are turned off by default in the Project panel display. |
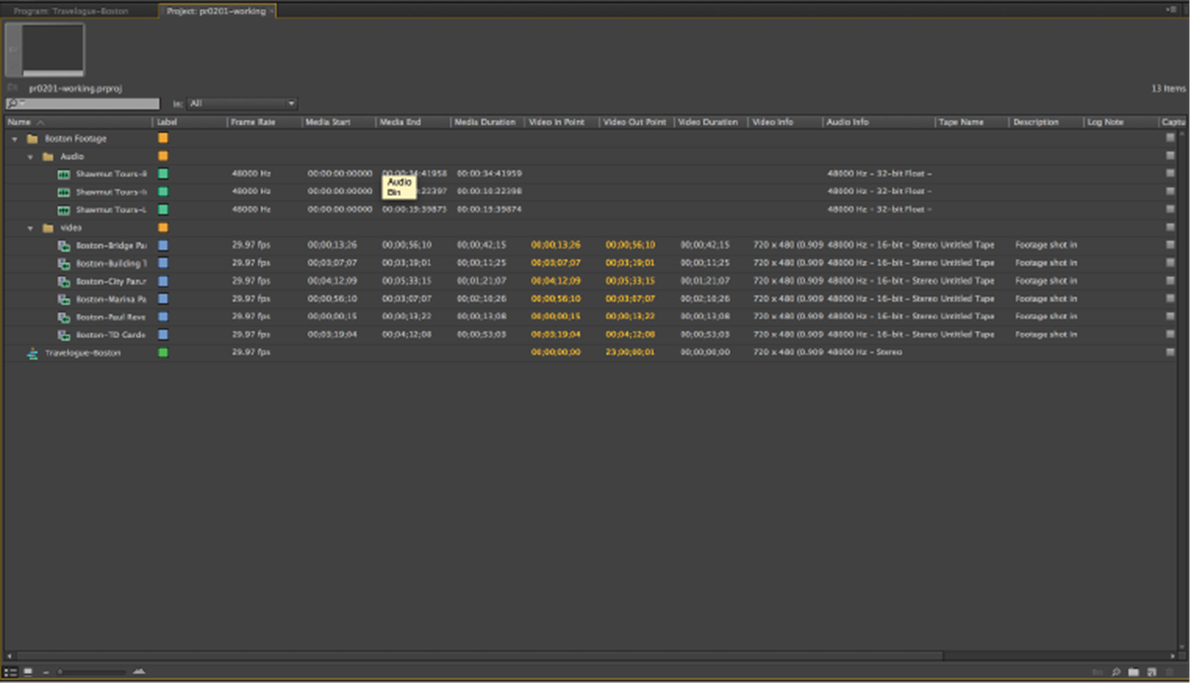
4 In the dialog box, disable the following attributes by clicking to clear the check mark to the left of the attributes.
| Frame Rate | Media Start | Media End | Media Duration | Video Info |
| Audio Info | Tape Name | Log Note | Capture Settings | Status |
| Scene | Good | | | |
You do not need these attributes for the work you will do in this project. The Media (displayed in Timecode) and Tape Name properties refer to the tape that these clips were captured from. The Frame Rate, Video, and Audio Info and Capture settings are the same for all the clips you will work with in this project. You will not use the other properties, such as Scene, because they are intended for a different type of project workflow than you will be working with here.
Understanding timecode

| |
| Timecode is used in video editing and motion graphics programs to keep track of your position along a Timeline, tape, or any time-based medium. You can identify timecode as a series of four numbers separated by colons or semicolons. As seen in the example above and reading from left to right, the numbers represent: Hours;Minutes;Seconds;Frames. |
You can count hours, minutes, and seconds in much the same way as you would with a standard clock, but the counting begins at zero instead of one. The one variable with timecode is the number of frames that make up a second, which is based on the frame rate of the media you are dealing with. Depending on the Composition settings, you could be using the American television standard of 30 FPS (frames per second), the European standard of 25 FPS, or the film standard of 24 FPS. In essence, timecode provides a discrete address to each frame of video.
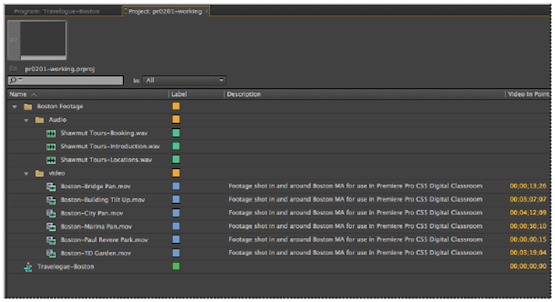
5 Click the OK button. The Project panel was reduced to a few columns.

| |
| The visible columns in the Project panel can be adjusted at any time depending on the needs of your project. |
6 Choose File > Save or press Ctrl+S (Windows) or Command+S (Mac OS) to save the project file.
Do not close this file; you will need it in the next exercise.
In the next section, you will edit the clip descriptions and change the order that the columns display in.
Adding a clip description
Some of the columns in the Project panel are purely descriptive; they display information about the properties of the footage you are working with. Columns such as Media Start, Media End, and Media Duration are non-editable, while others, such as Video In Point, Video Out Point, and Video Duration, can be changed as you work with your clips in Premiere Pro. Columns such as Description can be edited directly in the Project panel itself. Clip descriptions can be very helpful, especially when working on longer, more complex projects, or when working in a team environment. The Description column of the Project panel contains an editable text field that can be used to hold a wide variety of information, such as a content description, or to note intended usage.
1 With the Project panel still expanded to the full size of the screen and active, click the Description column header and drag it to the left. As you drag the column name, a dark highlight appears between each pair of names.
Drag the Description column until this highlight is between the Label and Video In Point columns, and then release it to rearrange the column order.

| |
| You can drag any column title to the left or right to change the arrangement of the Project panel’s columns. |
2 You have repositioned the Description column, but there is not enough room in the column to read all the text currently present.
Place your cursor on the dividing line between the Description and Label column headers. When the cursor changes to a double-headed arrow, click and drag to the right to change the width of the Description column and move all the other columns over.
After enlarging the Description column, repeat these steps for the Name column so you can see the full name of each audio and video file. Depending on the screen resolution of your monitor, enlarging the Name field may not be necessary.
| |
| You can quickly edit visually the width of each column directly from the Project panel interface. |
3 Locate the clip named Boston-TD Garden.mov. You can edit a clip’s Description property any time.
Click in the clip’s description field and replace the current generic description with the following text: Pan from left to right past the sports arena. Press the Enter (Windows) or Return (Mac OS) key on your keyboard to deselect this clip’s text field and automatically select the next clip’s description.
| | If you do not want to select the next clip’s description, you can click any empty area of the project panel with your cursor to deselect the active text field. |
4 Press the tilde (~) key on your keyboard to return the Project panel to its normal screen size.
5 Choose File > Save or press Ctrl+S (Windows) or Command+S (Mac OS) to save the project file.
In your own projects, you should consider giving each clip in the project panel a unique description. This can include any information you feel is important to your editing process, such as time of day, the subject of the shot, or notes on camera position or movement.
Organizing content by columns
The columns of the project panel are used to control how the different items in the panel display. You can arrange your clips based on the content of any column.
1 In the Project panel, the default organization is alphabetically based on the name. In the case of bins, the bin name is used to arrange all the media it contains. The active panel shows either a downward or upward pointing chevron next to the column header.
2 Click the Column Name to reverse the standard ascending display order and notice how items reverse their display order in the panel and are now displayed in descending order. When working on your own projects, you can choose the order you prefer. For this project, we will place the Travelogue-Boston Sequence at the top of the display.

| |
| The footage display in the Project panel can be based on any currently displayed column. Simply click on any column heading to reorder the footage in the panel. |
3 Choose File > Save or press Ctrl+S (Windows) or Command+S (Mac OS) to save the project file.
Choose File > Close Project to close this project and return to the Premiere Pro welcome screen.
LOCATING MISSING MEDIA
Premiere Pro creates a link between your project files and the files that you import into the Project panel. This linkage system allows you to have a very small project file, but at the same time requires that you manage the media you are using in your projects. If you move, rename, or delete files that you are using in a project you will receive a missing media warning when Premiere Pro starts up. You should always locate any missing files before attempting to proceed with your project.
The process for locating missing files is automatic and will help you find video, audio, still images, and even preview files. The next steps are not intended to be followed now but are instead presented here as reference for when you do encounter a missing media warning.
1 When presented with a file browser, verify the file name at the top of the dialog box. This is the file that you are currently trying to locate.
| |
| The application will automatically open the dialog box when a project with missing files is opened. |
2 Navigate to the missing file, highlight it, and then press the Open button to relink the file.

| |
| When all missing files have been recovered, the project will open. |
If your missing files are still in the same relative folder structure as when they were first imported into your project, then Premiere Pro should locate them all, once it knows the location of the first one. If it cannot automatically find other missing files you will have to locate them manually. Once all missing files have been found or skipped, the project will open.
There are technically three options when attempting to locate missing files; you can find the file and open it, skip the specific file, or set the file as offline. Offline files can be brought online by right-clicking on them in the Project panel and choosing Link Media from the menu that appears. In addition to the ability to skip and offline individual files, you also have buttons to skip and offline all files the application is currently attempting to locate.
III. What is an Adobe® Premiere Pro Workflow?
An Adobe Premiere Pro Workflow can be divided into three different main components:
· Ingest and acquisition of media
· Creative editing of media
· Delivery of finished media
The ingest and media acquisition functionality of Adobe Premiere Pro itself relies heavily on the capabilities of the Windows Explorer and the macOS Finder for searching.
Already here EditMate offers extended features for any collaboration Adobe Premiere Pro user. The media upload window of EditMate stores the media centrally or on a cloud storage of your choice. Once uploaded EditMate can transcode the media according to predefined templates as master media files and low bit rate “proxy” media. Ingesting through the EditMate web interface is an efficient workflow for non-editors ingesting media remotely to the workflow.
The ingest workflow can also be executed within the Premiere Pro user interface using the EditMate panel. A perfect solution for the creative editor extending Adobe Premieres Pro ingest capabilities with the advanced EditMate collaborative ingest, transcoding and metadata tagging of media.
The ingest and acquisition of media in EditMate allows for advanced metadata labeling both at file level and between timespans and segments.
Creative Editing
Collaboration and media management are vitally important parts of any creative and efficient editing workflow. You might recognize some below challenges?
- Having to manage massive data volumes
- Finding the material becomes more challenging the bigger systems get
- Being able to capture, edit and output more content, while at the same time being faster and more efficient
- Video files getting bigger, so efficient storage management is required to reduce infrastructure costs
- Collaboration becomes more important as teams might be spread across country or even worldwide
A common example of the challenge in collaboration in a feedback loop:
You have a tight deadline and your customer needs to be able to explain his or her views on the editing. One standard way is of course to burn in time code, render the file to a format you assume the customer can play, send this file using a common file transfer service. Then await an email with the time codes. Make the adjustments, render a new file and so on.
With EditMate your customer and reviewer have instant access to a prepared proxy version of your editing in a dynamic browser view. Comments will be reflected back in your EditMate panel and browser window as markers. The markers themselves now populates your timeline and the adjustments can be easily applied.
The Adobe Premiere Pro user will also be able to search content by a combination of search related metadata labels. Of, course this search granularity in the workflow process greatly improves the searchability in a large media material such as for example reality TV production.
Most production environments also have pre-defined technical specifications on project settings and delivery. EditMate can store these settings as templates making sure that the correct technical specifications are preserved throughout the workflow.
Delivery of finished media
Included in the Adobe Creative Cloud comes the powerful Adobe MediaEncoder CC. The Adobe Premiere Pro user can choose to export directly from the timeline itself, starting up the MediaEncoder and watch the process while the complete editing station is locked during the transcode process.
With EditMate comes an alternative option of sending the export, or render job to a MediaEncoder server. This frees up the Adobe Premiere Pro instance such that the user can continue working.
1.2.3 Creation of Media Bins/Events
Bins:
1. Have the same icon as a folder on your hard drive and work almost the same way.
2. Store your clips in a more organized way, by dividing them into groups.
3. Bins do not exist outside the Premiere project. You will not see them on your hard drive.
Creating bins:
1. Click the ‘New Bin’ button at the bottom of the Project panel.
2. Name your Bin.
3. Also you can create a Bin using File menu. Choose File-New-Bin.
4. Also you can create a Bin by right-clicking a blank area in the Project panel and choosing New Bin.
5. The quickest and easiest way to create a new Bin for your clips you already have in your project is to drag and drop the clips onto the New Bin button at the bottom of the Project panel.
Arrangement of bins/events
How to Create a Bin and Sub-Bins in Premiere Pro
To organize bins in Premiere Pro you first need to know how to create them. You have a few options. First, in the Project Panel click the New Bin icon (it looks like a folder). Second, you can right-click inside an empty area in the Project Panel and choose New Bin from the menu that appears. Or third, with the Project Panel active use the keyboard shortcut Command+B if you’re in a Mac or Control+B if you’re in Windows.

Once you do this a new bin will be created and automatically make it so you can type in a new name for it. When you’re done, click outside the bin or hit the return or enter key. At any time you can select a bin and hit the return or enter key to rename it.

To create a “sub-bin” (a bin within a bin), either 1) create a new bin and drag it into another bin or 2) select a bin then create a new bin and the new bin will be created inside of the bin that was selected. I will refer to the bin that contains the sub-bins as the “main bin” for this tutorial.
Don’t know what a bin is? Learn right here.
Organizing Bins in Premiere Pro
In the section above I explained main bins and sub-bins. The best way, in my opinion, to organize your bins is to have a handful of main bins (no more than 4-6) that house as many sub-bins as needed.
Learning Outcome 1.3: Create tracks and timeline
Understanding how tracks work
Much in the way that railway tracks keep trains inline, sequences have video and audio tracks that position the audio and image characteristics of the clips you add to them. The simplest form of a sequence would have just one video track and perhaps one audio track. You add clips to tracks, one after another, from left to right, and they play in the order you position them.
Sequences can have many video and audio tracks. A complex video presentation can easily have a half dozen video tracks and dozens of layer of audio. As the play head moves from left to right it Premiere will play all the audio tracks and show the uppermost video track. Lower level video tracks are only visible if the opacity of the track above them is altered.
Text is placed on a transparent background on the highest video track in order to overlay the primary video track below. You might use multiple audio tracks to create a complete audio composition for your sequence, with original source dialogue, music, spot audio effects like cheering or fireworks, atmospheric sound and voice-over.
Create a new sequence
Each sequence has a specific image size and number of frames per second, or frame rate. You can create as many sequences as you like in a project, but you will usually work with just one master sequence to create your video.
· To create a new sequence, click the New Item menu in the Project panel and choose Sequence from the drop-down menu. Choose a preset based on the camera you used to record your videos. Don’t worry if you choose the wrong setting; the first time you add a clip to the sequence, you can choose to adjust the settings to match the clip.
· You can also create a new sequence based on a clip’s properties by dragging the clip onto the New Item menu in the Project panel.
· You can check the sequence’s frame size and frame rate by viewing it in the Project panel using List view.
Add clips to a sequence
You build your project by adding clips to the sequence.
Build your sequence
· Drag clips from the Project panel onto a track in the Timeline panel to begin building your sequence.
· You can also drag a clip displayed in the Source Monitor into the Timeline panel. If you added In and Out marks to a clip, only the selected portion of the clip will be added to your sequence.
· Use the Drag Video Only or Drag Audio Only icon at the bottom of the Source Monitor to drag only the video or audio into your sequence.
Remove clips from a sequence
Some video editors prefer to add everything to a sequence and then remove the clips they don’t want, gradually reducing the content until only the best material remains.
Move clips in a sequence
After adding clips to your sequence, you’ll likely want to rearrange them as you develop your project.
· To change the order of clips in your sequence, drag a clip to a new position, leaving a gap and overwriting whatever is there when you drop it.
· Hold Control (Windows) or Command (macOS) while dragging a clip to insert the clip at its new location and push existing clips to the right.
· To select just the video or audio part of a linked clip, right-click the clip and choose Unlink.
· You can turn video and audio linking off or on for the whole sequence by clicking the Linked Selection button at the top left of the Timeline panel.
· Use the Razor tool to divide a clip into two pieces you can move separately.
1.3.1 Audio/Video tracks management
Ø Adding audio tracks
You can control the number of video tracks and the number and type of audio tracks by creating a custom preset. After you start editing, you can always add and delete tracks as needed.
To add a single video or audio track
1. To add a single video track, right-click the video track header area and choose Add Track . Premiere Pro adds a video track.

Right-click the video track header area.

Choose Add Track.
2. To add a single audio track, right-click the audio track header area and choose Add Track . Premiere Pro adds an audio track.
Right-click the audio track header area.

Changing Video Track Height

Keyboard Shortcut: Command + or –
When you drag footage into a new composition it will be ‘flat’ by default, meaning you won’t be able to see a visual thumbnail. If you want to see a visual thumbnail of the first frame, all you need to do is hit Command + or – with your timeline selected. This will allow you to adjust various effects like opacity and time remapping without having to open up the effects panel.
Changing Audio Track Height
Keyboard Shortcut: Option + or –
By default, you won’t be able to see audio waveforms. But if you simply use the Option + or – keyboard shortcut, you can scale the audio track up until the waveforms are visible. I find it much more helpful to have larger audio tracks and smaller video tracks.

LEARNING UNITY TWO: TRIM VIDEO
Learning Outcome 2.1: Insert media files on timeline
2.1.1 Add a clip to a sequence
You can add clips to a sequence in the following ways:
· Drag the clip from the Project panel or Source Monitor to a Timeline panel or the Program Monitor.
· Use the Insert and Overwrite buttons in the Source Monitor to add clips to a Timeline panel. Or use the keyboard shortcuts associated with those buttons.
· Automatically assemble a sequence from the Project panel.
· Drag the clip from the Project panel, Source panel, or Media Browser into the Program monitor.
An overwrite edit adds a clip by replacing any frames already in a sequence starting from the edit point and extending for the length of the clip. Overwrite is the default method when dragging a clip to a sequence or when rearranging clips in a sequence.
2.1.2 Target tracks
A sequence may contain several video and audio tracks. When you add a clip to a sequence, it is important to assign which track or tracks it is to be edited to. You can target one or more tracks, for both audio and video. Target tracks depending on the editing method you use: editing from the Source Monitor, dragging, or copy/pasting to the timeline.
· In advance of making an insert or overwrite edit, you can map the tracks of a clip loaded in the Source Monitor to one or more tracks of a sequence by dragging the source track indicator representing each of the source clip’s tracks into one or more selected tracks of the sequence. Audio source track indicators can be placed only in audio tracks matching the source clip’s channel configuration. For example, the audio track indicator for a stereo clip can be placed only in a stereo track in a sequence. After the tracks are targeted, edit the clip by pressing the Insert or Overwrite buttons (or use the shortcuts).
· When you drag a clip to a sequence as an insert or overwrite edit by dragging, you target the track automatically by dropping the clip into the track. You do not need to specify tracks in advance. A drag edit is an overwrite edit by default. If you are performing an insert edit with the clip, press Ctrl (Windows) or Command (Mac OS) as you drag. As you make the edit, triangles appear showing the affected tracks.
· When you add clips to a sequence by pasting, (or keyboard shortcuts), you must specify target tracks in advance. You can target more than one video track or more than one audio track at a time. Also, you can choose to target a video track only or an audio track only. Click the track or tracks you want to target in the track header area of a Timeline panel. The track header area for a targeted track appears highlighted.
2.1.3 Drag video and audio to a sequence
By default, when dropped into a sequence, the video and audio components of linked clips appear in corresponding tracks (for example, Video 1 and Audio 1), unless the audio channel type of the clip is incompatible with the target track. In this case, the linked audio appears in the next compatible track, or a compatible track is created automatically.
· To drag the video and audio portions of a clip to specific tracks, drag the clip from the Source Monitor or Project panel into a Timeline. When the video portion of the clip lies above the desired video track, press and hold Shift. Continue holding shift, and drag downward past the bar separating video and audio tracks. When the audio portion of the clip lies above the desired audio track, release the mouse and release Shift.
· To drag the video portion of a clip to the Video 1 track and the audio to any audio track, drag the clip from the Source Monitor or Project panel past the line that separates the video tracks from the audio tracks. Drop the clip above the audio track where you want the audio portion to land. The video portion of the clip will remain in the Video 1 track, and the audio portion lands in the desired audio track.
· To perform an overwrite edit, drag the clip from the Source Monitor or Project panel to an appropriate track in a Timeline panel at the point you want the clip to start. The destination area is highlighted, and the pointer appears with the Overwrite icon
· To perform an insert edit, Ctrl-drag (Windows) or Command-drag (Mac OS) the clip from the Source Monitor or Project panel to an appropriate track in a Timeline panel at the point you want the clip to start. The destination area is highlighted, and the pointer appears with the Insert icon
· To perform an insert edit and shift only target tracks, Ctrl+Alt-drag (Windows) or Command+Option-drag (Mac OS) the clip from the Source Monitor or Project panel to an appropriate track in a Timeline panel at the point you want the clip to start. The destination area is highlighted, and the pointer appears with the Insert icon
· (Roman keyboards only) To zoom into or out of a clip as you drop it into a Timeline panel, drag and press the equal sign key (=) to increase the zoom factor or press the minus sign key (–) to decrease it. Do not use the keys on the number pad.
The clip will land in a Timeline panel, and a Timeline panel will become active, making it easy to playback the clip just added to the sequence.
Drag video only or audio only to a sequence
You can add the video track, the audio tracks, or both types of tracks of a clip to a sequence. When you drag a clip from the Project panel or from the main viewing area of the Source Monitor, you automatically add both types of tracks. If you want to add only one type of track, add it from the Source Monitor.
- Double-click a clip in a Project panel or Timeline panel to open it in the Source Monitor.
- In the Source Monitor, do one of the following:
· To drag all audio and video tracks of the clip, drag from anywhere inside the main viewing area.
· To drag only the video track of the clip, drag from the Drag Video Only icon
· To drag only the audio tracks, first target in the Timeline panel the tracks you want to receive the clip audio tracks. Then map the audio tracks you want to use to the target audio tracks. Then, drag from the Drag Audio Only icon
Insert a clip into a sequence
- Double-click a clip in a Project panel or sequence to open it in the Source Monitor.
- Place the playhead at the point in the sequence where you want to insert the clip.
- In the Timeline panel, click the headers of the tracks where you want to insert the source clip’s components to target them.
- Drag the source clip track indicators to the headers of the tracks where you want to insert the source clip’s components.
- Click the Sync Lock box in the header of any track you want to shift as a result of the insertion.
- In the Source Monitor, click the Insert button
The audio and video components of the clip will be inserted into the tracks selected at the playhead. Clips to the right of its location on its own track and tracks with Sync Lock enabled will shift to the right by the length of the inserted clip.
Make three-point and four-point edits
The Source and Program Monitors provide controls to perform three-point and four-point edits—standard techniques in traditional video editing.
In a three-point edit, you mark either two In points and one Out point, or two Out points and one In point. You don’t have to actively set the fourth point; it’s inferred by the other three. For example, in a typical three-point edit you would specify the starting and ending frames of the source clip (the source In and Out points), and when you want the clip to begin in the sequence (the sequence In point). Where the clip ends in the sequence—the unspecified sequence Out point—is automatically determined by the three points you defined. However, any combination of three points accomplishes an edit. For example, sometimes the point where a clip ends in a sequence is more critical than where it begins. In this case, the three points include source In and Out points, and a sequence Out point. On the other hand, if you need the clip to begin and end at particular points in the sequence—say, perfectly over a line of voice-over narration—you could set two points in the sequence, and only one point in the source.
In a four-point edit, you mark source In and Out points and sequence In and Out points. A four-point edit is useful when the starting and ending frames in both the source clip and sequence are critical. If the marked source and sequence durations are different, Premiere Pro alerts you to the discrepancy and provides alternatives to resolve it.
Make a three-point edit
- In a Project panel, double-click a clip to open it in the Source Monitor.
- Click the headers of the tracks in a Timeline panel into which you want to add the clip to target them.
- In the Timeline, drag the source track indicators to the headers of the tracks into which you want the clip components to fall.
- In the Source and Program Monitors, mark any combination of three In and Out points.
- In the Source Monitor, do one of the following:
· To perform an insert edit, click the Insert button
· To perform an overwrite edit, click the Overwrite button
Make a four-point edit
- In a Project panel, double-click a clip to open it in the Source Monitor.
- Click the headers of the tracks in a Timeline panel into which you want to add the clip to target them.
- In the Timeline, drag the source track indicators to the headers of the tracks into which you want the clip components to fall.
- Using the Source Monitor, mark an In point and an Out point for the source clip.
- In the Program Monitor, mark an In point and an Out point in the sequence.
- in the Source Monitor, do one of the following:
· To perform an insert edit, click the Insert button
· To perform an insert edit and shift clips in target tracks only, Alt-click (Windows) or Option-click (Mac OS) the Insert button
· To perform an overwrite edit, click the Overwrite button
- If the marked source and program durations differ, select an option when prompted:
Change Clip Speed (Fit to Fill)
Maintains the source clip’s In and Out points, but changes the clip’s speed so that its duration matches the duration determined by the sequence In and Out points.
Trim Clip’s Head (Left Side)
Automatically changes the source clip’s In point so that its duration matches the duration determined by the sequence In and Out points.
Trim Clip’s Tail (Right Side)
Automatically changes the source clip’s Out point so that its duration matches the duration determined by the sequence In and Out points.
Ignore Sequence In Point
Disregards the sequence In point you set, and performs a three-point edit.
Ignore Sequence Out Point
Disregards the sequence Out point you set, and performs a three-point edit.
Replace one clip with another in a Timeline
You can replace one clip in a Timeline panel with another from the Source Monitor or a bin, retaining any effects that were applied to the original clip in a Timeline.
Using one of the following keyboard modifiers, drag a clip from the Project panel or Source Monitor onto a clip in a Timeline panel:
· To use the In point of the new clip, Alt-drag (Windows) or Option-drag (Mac OS). You may use the In point of the new clip, for example, if you have already trimmed it to start at the desired point of the action.
· To apply the In point of the original clip to the new clip, Shift-Alt-drag (Windows) or Shift-Option-drag (Mac OS). You may apply the In point of the original clip to the new clip, for example, if the new clip was shot synchronously with the original clip using another camera. In this case, applying the In point from the original clip will start the new clip from the same point in the action.
In a Timeline, clip position and effects are preserved, and any effects that were applied to the original clip are applied to the replacement clip.
Replace the source footage for a clip
You can replace the source footage for any clip in the Project panel. Replacing the source footage for a clip links it to a new source file. All instances of the clip and its subclips are retained in the Project panel and Timeline, with their In and Out points, and any applied effects, intact. However, the clip becomes linked to the replacement footage instead of its original footage. You can easily replace, for example, placeholder footage with final footage, or footage with a soundtrack in one language with identical footage with a different-language soundtrack, and keep all the same edits that were made with the original footage.
- In the Project panel, select the clip for which you want new source footage.
- Select Clip > Replace Footage.
- In the Replace Footage For dialog box, browse to the file containing the replacement footage.
- To rename the clip with the replacement footage filename, check Rename Clip To Filename.
- Click Select.
Set sequence In and Out points
- Navigate to the In point in a Timeline panel and click the Set In Point button
- Navigate to the Out point in a Timeline panel and click the Set Out Point button
Set sequence In and Out points around a selection
- In a Timeline panel, select one or more clips, or a gap, in the sequence.
- Choose Marker > Mark Selection. This sets sequence In and Out points that match the selection’s In and Out points.
To set sequence In and Out points that match a clip’s In and Out points, select Marker > Mark Clip.
Remove sequence In and Out points
- Make sure that the sequence is open in the Program Monitor.
- Choose Marker > Clear Sequence Marker, and then choose an option to clear the In point, the Out point, or both.
Note:
You can also clear an In or Out point by Alt-clicking (Windows) or Option-clicking (Mac OS) the Set In button
Learning Outcome 2.2: Create rough-cut
A rough cut is a timeline-based sequence of video and audio clips that is used as a basic editing process of the various clips before the final sequence is completed. Editing processes include trimming, clips selection, and sorting and ordering the clips.
Create a rough cut
1. Select File > Create Rough Cut.
2. Enter a name for the rough cut (.arcutx) file, and click Save.
3. Double-click the rough cut in the Project panel to open it in the Timeline and Monitor panels.
4. Select the movie clips or subclips to add to the rough cut.
5. Select File > Append To Rough Cut. The movie clips are added to the Timeline in the order in of their selection. Alternatively, drag the movie clips to the Timeline.
6. Use the options in the Rough Cut menu to select or reorder movie clips in the rough cut.
7. Save the project to save changes to the rough cut file.
Add markers to a rough cut
1. Open a clip containing markers in the timeline. Open the rough cut in the background.
2. Select the markers that you want to add to the rough cut.
3. Select Rough Cut > Add Selected Markers.
The markers are added to the rough cut currently open in the timeline. The clip from which user is adding the marker is also added to Rough Cut.
Add Voice-over to Rough Cuts
You can record and add voice-overs to Rough Cuts. Although Prelude lets you add Audio clips separately, you can use the voice-over feature to record audio clips on the fly.
You can record and overlay voice-overs over video footages during the basic editing process, before the final sequence is complete. Adobe Prelude lets you add multiple voice-overs to a rough cut, as well.
To record voice-overs for a rough cut, do the following steps:
Add an audio track
1. Select Roughcut > Create A Roughcut to create a roughcut, and open it on timeline.
2. In the Timeline, right-click > select Add Audio Track from the context menu.
3. You can choose to add a Mono, Stereo, or 5.1 track.

2.2.2. Use of editing tools
Each icon in this panel represents a tool that performs a specific function, typically a type of edit in a sequence. When you select a tool, the pointer changes shape according to the selection. Understanding the shortcuts to these tools will save time editing.

The 5 Most Useful Tools in Adobe Premiere Pro
Premiere Pro is packed with an array of powerful video editing tools, but these are some of the most useful.
1. The Ripple Edit Tool

The term "Ripple" is widely applicable in Premiere Pro. In a general sense, a Ripple can be used to describe any action that pushes or pulls what is in front of or behind the affected clip proportionally.
For example, Ripple can delete the blank gap between two clips, seal the space between them, and bring everything behind them along in terms of timecode. In other words, deleting a one-frame gap advances the rest of the project one frame, depending on which tracks are enabled.
2. The Rolling Edit Tool

Two adjacent shots may match very well in terms of timing. You may feel that lingering on the first or getting to the second sooner would improve the pair creatively, however.
A Rolling edit leaves the action of the sequence undisturbed, and only shifts the temporal window that we peer through. If pulling two conjoined handles forward, the end point of the first clip will be extended, while the in point of the second will be reduced by the same number of frames.
A strong progression is made more powerful—snap cuts swing the audience to and fro; a pensive moment of pause keeps us with our subject until their reverie moves us into cinematic submission. These small "swings" will color the piece; the magic will always be found in the tiny details making up your sequence as a whole.
3. The Slip Tool
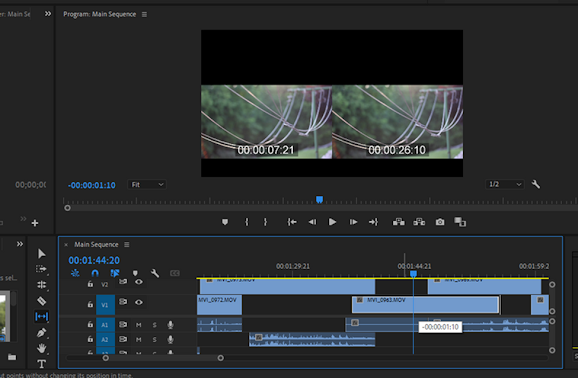
The Slip tool is one of the most convenient ways of subtly adjusting the timing of a sequence that you already feel comfortable with the structure of. It preserves the length of the clip as it exists in the timeline, while also allowing you to nudge the section of the source footage that the beginning and the end of the clip hold between them.
With the Slip tool enabled, click on the clip that you would like to move forward or back. Dragging one way or another pulls up two reference thumbnails in the program monitor, indicating where the new in and out points will end up being.
This is very useful for narrative editing, especially when you find yourself in a corner in terms of continuity and flow. You'll be able to delay the action by a few frames if, say, one of your actors picks up their glass just a bit too quickly to match up comfortably with the following shot.
4. The Slide Tool

Sliding a clip back or forth keeps the selected clip exactly as-is, all while freeing you to move it without creating a gap to be addressed afterward. How?
The handles of the two neighboring clips on either side will remain the same—they will be shortened and lengthened to match the intermediary's new position, maintaining the same points of contact as before.
5. The Track Select Tool

When editing large projects, bumping and grinding against the delicate work that has already been done can spell disaster. Nesting your sequences will protect them to some extent, but the demands of a project or the system that you're working with do not always allow for this.
Using the Track Select Forward tool gives you the means to make some room on the timeline or to bridge a gap without Ripple deleting the entire space in between. With the tool selected and the relevant juncture in mind, select the first clip in line, hold Shift and add to your selection accordingly if you have more than one track to consider.
Doing so will select everything behind your clip (or, if using the Track Select Backward tool, in front of it), allowing you to move everything all at once, without worrying about missing something important at the end or beginning. The entire sequence will be included automatically, allowing you to wedge in one more shot, even very late in the editorial process.


0 Comments